


That old vanity bar light with the frosted globes has been casting shadows under your eyes for years. Every morning, you lean into the mirror and the light hits the top of your head instead of your face. Makeup looks different in the car. Shaving spots get missed. And honestly? The fixture itself looks like it belongs in 1997.
Good news. Learning how to install bathroom vanity light fixtures is one of the easiest electrical upgrades you can do. Most homeowners and DIYers handle it in 30-45 minutes with basic tools. No drywall cutting. No new wiring. Just disconnect the old one, connect the new one, and mount it.
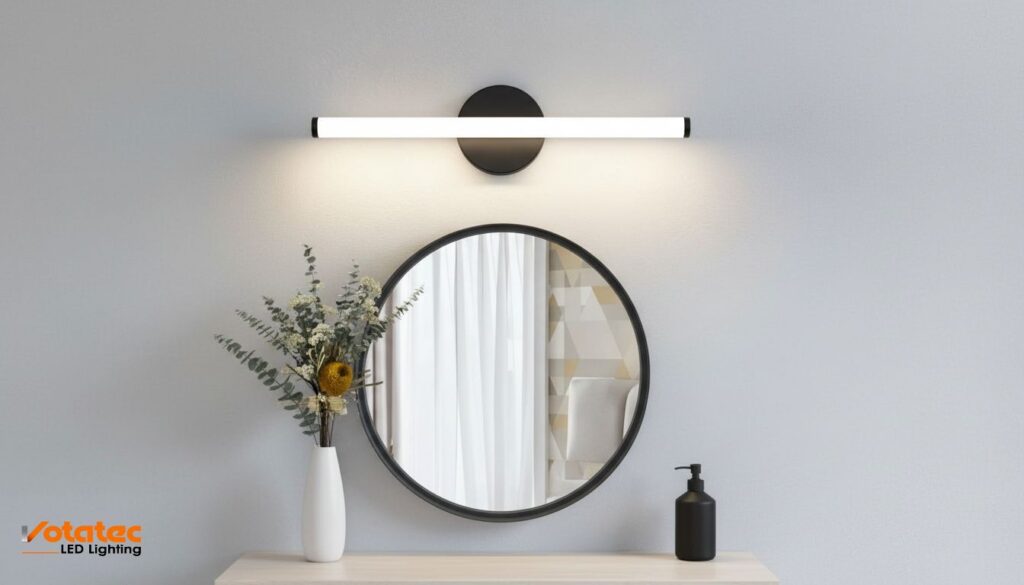
Votatec offers a range of modern LED vanity light fixtures designed for Canadian bathrooms, from slim linear bars to multi-bulb options, all CSA-certified and rated for damp locations. But before you pick a fixture, let’s make sure you get the sizing, placement, and installation right.
Here’s everything you need to know.
What Size Bathroom Vanity Light Do You Need?
Size matters more than most people think with vanity lighting. Too small and the fixture looks lost above the mirror. Too wide and it overhangs the edges awkwardly. The rule is simple but important.
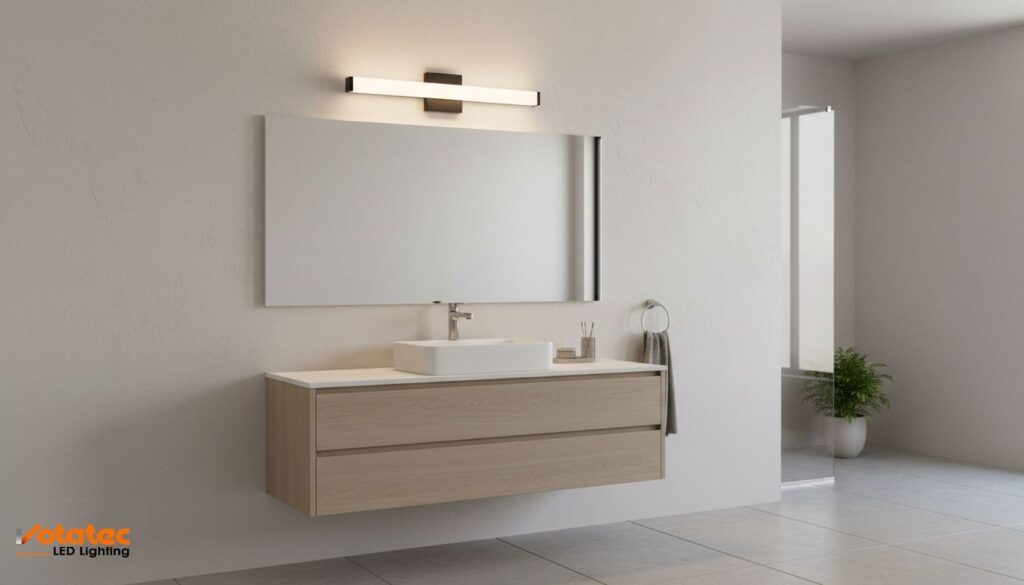
Your vanity light should be roughly 75% the width of your mirror. Not the vanity cabinet. The mirror.
So if your mirror is 36 inches wide, your vanity light should be around 24-30 inches. If the mirror is 48 inches, aim for 36-42 inches. This creates visual balance and makes sure light spreads evenly across your face without spilling past the mirror edges.
Vanity Light Size Guide:
| Mirror Width | Recommended Light Width | Common Fixture Type |
| 24 inches | 16-20 inches | 2-light bar or small linear |
| 30 inches | 20-24 inches | 2-3 light bar |
| 36 inches | 24-30 inches | 3-light bar or medium linear |
| 48 inches | 36-42 inches | 4-light bar or long linear |
| 60 inches | 44-50 inches | 4-5 light bar or extended linear |
| 72 inches (double) | Two separate fixtures | One fixture centred over each sink |
For double vanities with two sinks and one long mirror, you’ve got two options. One long fixture centred above the mirror, or two smaller fixtures, each centred above its respective sink. Two separate fixtures usually look better and provide more even lighting for both users.
How to Position a Vanity Light Over Mirror for Best Results
Centring your vanity light over mirror seems obvious. But there’s more to it than just finding the middle.
Horizontal centring. Measure the mirror width. Find the centre point. Mark it on the wall above the mirror. That mark should align with the centre of your fixture’s mounting bracket. If your junction box is already centred above the mirror, you’re set. If it’s off-centre, some fixtures have adjustable mounting plates that let you shift the fixture up to 2 inches left or right to compensate.
Vertical placement matters too. The bottom edge of the fixture should sit 2-4 inches above the top edge of the mirror. Any higher and the light misses your face. Any lower and the fixture visually crowds the mirror.
For the best facial illumination, side-mounted sconces flanking the mirror at eye level (60-65 inches from the floor) actually outperform overhead vanity bars. They eliminate the shadows that overhead-only lighting creates under the chin and eyes. But if you’re working with a single junction box above the mirror, which is the standard in most Canadian bathrooms, an overhead vanity light is your practical option.
What Height Should a Bathroom Vanity Light Be Installed?
The standard mounting height for a bathroom vanity light is 75-80 inches from the floor to the centre of the fixture. This puts the light roughly 6-8 inches above a standard 68-70 inch tall mirror.
But here’s the thing. That’s a guideline, not a law. Adjust based on your specific situation:
- Tall ceilings (9-10 ft). You can go up to 80-84 inches. This gives more breathing room between the mirror and fixture.
- Low ceilings (7-8 ft). Drop to 72-76 inches so the fixture doesn’t feel like it’s pressed against the ceiling.
- No mirror yet? If you’re installing the light before hanging a mirror, mount at 78 inches as a safe default. Most standard mirrors will work with this height.
- Vessel sinks or raised vanities. If your vanity counter is higher than the standard 32-34 inches, the mirror sits higher too. Adjust the light up accordingly to maintain that 2-4 inch gap above the mirror.
The junction box location usually dictates where the fixture goes. If the existing box is at the right height, great. If it’s too high or too low, you can either move the box (requires drywall patching) or choose a fixture with a long enough backplate to cover the gap.
How to Install Bathroom Vanity Light: Complete Step-by-Step
Alright. You’ve picked your fixture, measured your mirror, and know where it’s going. Here’s how to install bathroom vanity light fixtures from start to finish.
Tools and Materials You’ll Need
| Tool / Material | Purpose |
| Non-contact voltage tester | Verify power is off |
| Phillips screwdriver | Mount bracket, connect fixture |
| Flathead screwdriver | Tighten wire nuts, pry old fixtures |
| Wire nuts (included with most fixtures) | Connect wires |
| Electrical tape | Secure wire nut connections |
| Step ladder | Reach the junction box |
| Pencil | Mark mounting holes |
| Level | Make sure fixture hangs straight |
| Drill with masonry/drywall bit | Only if mounting bracket needs new holes |
| Wire strippers | Only if wire ends need trimming |
Most bathroom vanity light fixtures come with all necessary mounting hardware, wire nuts, and installation instructions. Read those instructions first. Every fixture is slightly different.
Vanity Light Wiring: Connecting the Fixture Safely
This is the part that makes people nervous. But vanity light wiring is straightforward if you follow the steps.
Step 1: Kill the power.
Turn off the circuit breaker for the bathroom. Not just the wall switch. The breaker. Then flip the wall switch on and confirm the old light doesn’t turn on. Use a non-contact voltage tester at the junction box to double-check. No exceptions.
In Canada, all electrical work must comply with the Canadian Electrical Code. The Electrical Safety Authority (ESA) in Ontario requires that electrical modifications be performed safely and to code. If you’re not comfortable working with electrical wiring, hire a licensed electrician.
Step 2: Remove the old fixture.
Unscrew the mounting screws or decorative nuts holding the old fixture to the wall. Carefully pull the fixture away from the wall, exposing the wiring connections. You’ll see wire nuts connecting the fixture’s wires to the house wires. Unscrew the wire nuts, separate the wires, and set the old fixture aside.
Step 3: Inspect the junction box.
Make sure it’s securely fastened to the wall framing. A loose box means a wobbly fixture. If the box is plastic and feels flimsy, consider upgrading to a metal box rated for fixture support. Also check that the house wires (black/hot, white/neutral, and bare copper/ground) are in good condition. If wire ends are nicked, corroded, or brittle, trim them back half an inch and strip fresh insulation.
Step 4: Install the new mounting bracket.
Your new fixture includes a mounting bracket (also called a crossbar or strap). Attach it to the junction box using the provided screws. Use a level to make sure it’s straight. This bracket is what holds the fixture to the wall, so make sure it’s tight.
Step 5: Connect the wires.
This is standard residential wiring:
- Black to black (hot to hot). Twist the bare copper ends together clockwise, then screw on a wire nut.
- White to white (neutral to neutral). Same method.
- Green or bare copper to green or bare copper (ground to ground). Connect to the ground screw on the mounting bracket if the fixture doesn’t have a ground wire.
Wrap each wire nut connection with a turn of electrical tape for extra security. Gently push all wires back into the junction box.
Step 6: Mount the fixture.
Align the fixture’s mounting holes with the bracket screws. Slide the fixture onto the bracket and tighten the decorative nuts or screws by hand. Don’t over-tighten, especially on glass or ceramic fixtures. You’ll crack them.
Step 7: Install bulbs and test.
Insert the correct bulbs (check the fixture’s maximum wattage rating). Turn the breaker back on. Flip the switch. Light.
That’s it. The whole process takes 30-45 minutes for most fixtures.
How to Install Bathroom Vanity Lights With Multiple Bulbs?
Multi-bulb vanity bars (3-light, 4-light, or 5-light) install exactly the same way as a single fixture. The wiring is identical because all the bulbs connect to the same internal wire harness. You’re still connecting one black, one white, and one ground wire to the house wiring.
The only extra consideration is weight and balance. A 4 or 5-light vanity bar can be heavy, especially with glass shades. Have someone hold the fixture against the wall while you connect the wires and tighten the mounting hardware. Trying to hold a 10-pound fixture overhead with one hand while wiring with the other is a recipe for dropped glass and frustration.
For how to install bathroom vanity lights that are extra long (40+ inches), make sure the mounting bracket is level before attaching the fixture. Even a 1-degree tilt is obvious on a long fixture. Use a torpedo level on the bracket and adjust before tightening.
How to Replace an Old Bathroom Vanity Light With a New Fixture
Replacing an existing fixture is easier than a brand-new installation because the junction box, wiring, and switch are already in place. But there are a few things to check before you assume it’s a simple swap.
Bathroom Lighting Electrical Safety: Codes and Damp Ratings
Bathrooms are wet environments. And the Canadian Electrical Code has specific requirements for lighting fixtures in bathrooms.
Damp vs. Wet location ratings. Most bathroom vanity lights need a “Damp Location” rating at minimum. This means the fixture is designed to handle humidity, steam, and occasional splashes but not direct water contact. Fixtures inside showers or directly above bathtubs need a “Wet Location” rating.
Your vanity light, mounted above the mirror and away from direct water, typically needs only a Damp rating. Check the fixture’s label or spec sheet. It should say “Suitable for Damp Locations” or show the UL/CSA damp rating mark.
CSA certification is mandatory. Every electrical fixture installed in Canada must carry CSA or cUL certification. Non-certified fixtures violate the Canadian Electrical Code and create liability issues. Always check for the CSA or cUL mark before purchasing.
GFCI protection. Bathroom circuits in Canada must be GFCI (Ground Fault Circuit Interrupter) protected. This is typically handled at the outlet level or the breaker panel, not the light fixture. But if you’re working in the junction box and notice older wiring without GFCI protection, flag it for an electrician to address.
What If the New Fixture Doesn’t Match the Old Junction Box?
This happens more often than you’d think. The old fixture had a mounting bracket that covered a specific area. The new fixture has a different bracket that exposes part of the old hole, unpainted wall, or misaligned screw holes.
Solutions:
- Oversized canopy or backplate. Many modern vanity lights have large backplates that cover the junction box and surrounding wall area generously. If your new fixture’s backplate is smaller than the old fixture’s footprint, you’ll see the outline of the old mounting holes or paint shadow. Choose a fixture with a large enough canopy to cover the existing marks.
- Junction box extender. If the existing box is recessed too far into the wall for the new bracket to reach, a box extender brings the mounting surface forward. They cost a few dollars and install in minutes.
- New mounting bracket orientation. Some fixtures mount with the bracket horizontal and others vertical. If your junction box screws are oriented differently than the new bracket expects, a universal crossbar adapter solves the alignment issue.
- Patch and repaint. If nothing else works, fill the old holes with spackle, sand smooth, and repaint the area. Then install the new fixture’s bracket on fresh wall surface. Takes an extra day for drying time but gives a clean result.
Why Choose an LED Vanity Light Fixture for Your Bathroom?
If you’re installing a new vanity light in 2026, LED is the obvious choice. Incandescent vanity bars waste 90% of their energy as heat, halogen bulbs burn hot enough to scorch nearby surfaces, and CFL bulbs take 30 seconds to warm up and make everyone look grey. None of that is ideal in a bathroom.
LED vanity light fixtures deliver better light, use 75-80% less energy, and last 25,000-50,000 hours. That’s 10-20 years of daily bathroom use without changing a single bulb. For a fixture that’s mounted at ceiling height and requires a ladder to service, that lifespan matters.
Energy-efficient bathroom lighting also qualifies for incentive programs throughNatural Resources Canada when part of a broader home energy retrofit. Every fixture counts toward your home’s overall efficiency rating.
What Colour Temperature Is Best for Bathroom Vanity Lights?
This is the decision that affects how you look in the mirror every day. Get it wrong and you’ll hate your bathroom lighting no matter how nice the fixture is.
Colour Temperature Guide for Bathroom Vanity Lights:
| Colour Temp | Look | Best For |
| 2700K | Warm amber, relaxed | Guest bathrooms, spa-style ensuites |
| 3000K | Warm white, flattering | Most residential bathrooms, master ensuites |
| 3500K | Neutral, balanced | Bathrooms used for detailed grooming, makeup |
| 4000K | Cool white, bright | Commercial washrooms, medical offices |
For most Canadian residential bathrooms, 3000K is the sweet spot. It’s warm enough to be flattering without the yellow cast of 2700K. It makes skin tones look natural and makes the bathroom feel inviting.
If you apply makeup or do detailed grooming, consider 3500K for a more neutral, true-colour light. Avoid 4000K and above in residential bathrooms. It’s too clinical and makes the space feel cold.
CRI Matters: Why Your Bathroom Light Should Be 90+
CRI (Colour Rendering Index) measures how accurately a light source renders colours compared to natural sunlight. Sunlight is 100. Most LED fixtures range from 80 to 95+.
For a bathroom, CRI matters more than almost any other room. You’re looking at skin tones, makeup, clothing colours, and your own reflection every day. A fixture with CRI 80 makes colours look slightly washed out. CRI 90+ makes everything look natural and accurate.
The practical difference:
| CRI Rating | Effect in Bathroom |
| 80 CRI | Acceptable but colours look slightly flat |
| 85 CRI | Good, most colours render accurately |
| 90+ CRI | Excellent, skin tones and colours look natural |
| 95+ CRI | Premium, closest to natural daylight accuracy |
When shopping for LED vanity light fixtures, check the CRI rating on the spec sheet. Don’t assume all LEDs are the same. Budget fixtures often use CRI 80 LEDs. Quality fixtures from brands like Votatec use CRI 90+ LEDs that make your bathroom mirror experience genuinely better.
FAQs About Installing Bathroom Vanity Lights
1. Can I install a bathroom vanity light myself or do I need an electrician?
If you’re replacing an existing fixture using the same junction box and wiring, most homeowners can handle it as a DIY project. Turn off the breaker, verify power is off, and follow the wiring steps (black to black, white to white, ground to ground). However, if you need to run new wiring, add a junction box, or modify circuits, hire a licensed electrician. In Ontario, the ESA requires permits for new circuit work.
2. How to install bathroom vanity light on drywall without a stud?
Your vanity light mounts to the electrical junction box, not directly to the drywall. The junction box should be secured to a wall stud or a support bracket between studs. If the existing box is loose, reinforce it with a box support bar that spans between studs before mounting the new fixture. Never hang a light fixture from drywall alone. It will pull out over time.
3. Should bathroom vanity lights face up or down?
Both work, but each creates a different effect. Upward-facing shades bounce light off the ceiling for softer, ambient illumination. Downward-facing shades direct light onto the vanity and mirror for more focused, functional lighting. For the most flattering bathroom lighting, downward or forward-facing fixtures work best because they put light where you need it, on your face.
4. How many lumens do I need for bathroom vanity lighting?
For a standard bathroom, aim for 1,600-2,400 lumens total from your vanity light fixture. A small powder room can get by with 1,200-1,600 lumens. A large master ensuite with a double vanity may need 2,400-3,200 lumens. These numbers assume the vanity light is the primary light source. If you have additional recessed lights in the ceiling, you can go lower on the vanity fixture output.
5. Can I put a dimmer on a bathroom vanity light?
Yes, as long as the LED fixture and bulbs are dimmer-compatible. Check the fixture spec sheet for “dimmable” rating and use an LED-compatible dimmer switch, not a standard incandescent dimmer. Standard dimmers can cause LED flickering, buzzing, and premature driver failure. Dimming is great for bathrooms because you can have full brightness for grooming and lower output for relaxing evening baths.
Bottom Line: How to Install Bathroom Vanity Light the Right Way
Installing a bathroom vanity light is a 30-45 minute project that transforms the most-used mirror in your home. Get the sizing right (75% of mirror width), mount at the correct height (75-80 inches from floor), and wire carefully with the breaker off. That’s really all there is to it.
And if you’re upgrading from an old incandescent bar to a modern LED fixture, you’ll notice the difference immediately. Better light on your face, lower energy bills, and a fixture that won’t need attention for a decade or more.
Votatec offers CSA-certified LED vanity light fixtures with CRI 90+ ratings, damp location certification, and modern designs built for Canadian bathrooms. Multiple sizes, colour temperatures, and finishes to match any vanity and mirror combination.